Preparing the Production Environment

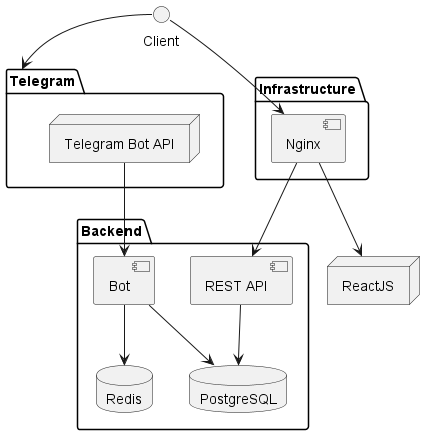
On the diagram above, you can see the project's composition. In this configuration, you can run the project on your server.
How does production mode operate?
- Your browser sends requests to NGINX.
- For general site access, NGINX uses static files created by React in
/var/app/medsync/. - For anything under
/api/, NGINX forwards the request to our backend onhttp://localhost:3779. - React's production-ready files are made with
npm run build.
The following is the list of actions you need to take to set up the development environment:
1. Setting up NGINX
Installing NGINX
-
First, ensure your package lists are updated:
-
Install NGINX:
-
After the installation completes, start NGINX and enable it to start at boot:
-
You can check the status to confirm NGINX is running:
Configuring NGINX for Your Domain
-
Navigate to the
sites-availabledirectory: -
Create a new configuration file for your domain (replace
your_domainwith your actual domain name): -
In the editor, add the following basic configuration, adjusting
your_domainas appropriate:server { server_name your_domain; root /var/app/medsync/; index index.html; # FRONTEND location / { try_files $uri $uri/ /index.html; } # BACKEND location /api/ { proxy_pass http://localhost:3779; proxy_set_header Host $host; proxy_set_header X-Real-IP $remote_addr; proxy_set_header X-Forwarded-For $proxy_add_x_forwarded_for; } } -
Save and exit.
Explanation of config
-
root /var/app/medsync/;This line tells NGINX where to look for the files to serve. In this case, we're telling NGINX to look for the files in the
/var/app/medsync/directory. This is the directory where our frontend application will be running. (refer todocker-compose.ymlfile, the volume fordistdirectory). -
location / {...}This block configures how to respond to requests that start with
/. This is the url where our frontend application will be running. The frontend application is a static website, so we need to tell NGINX to serve theindex.htmlfile when a request is made to/. -
location /api/ {...}This block configures how to respond to requests that start with
/api/. This is the url where our backend API server will be running. -
proxy_pass http://localhost:3779;Inside the
/api/block, this line tells NGINX to pass requests meant for the API to backend application, this one running on port3779. (refer todocker-compose.ymlfile).
-
Create a symbolic link from
sites-availabletosites-enabled: -
Test the NGINX configuration for syntax errors:
-
If no errors are displayed, reload NGINX:
2. Setting Up Let's Encrypt
Info
This will install an SSL certificate for your domain, that you wrote in the NGINX configuration file.
Make sure you have a domain name and that it's pointing to your server's IP address before proceeding. Read more
Installation
-
Install Certbot (the tool we'll use to obtain SSL from Let's Encrypt):
-
Request a certificate for your domain:
Follow the on-screen instructions. When prompted about redirecting HTTP traffic to HTTPS, it's recommended to choose the option to redirect.
Once the process completes, Certbot will have modified the NGINX configuration file and reloaded the server.
Automatic Renewal of Let's Encrypt Certificates
Let's Encrypt certificates are valid for 90 days. To ensure your certificate is always valid, you should set up an automatic renewal:
- Test the renewal process:
If no errors are displayed, Certbot's renewal process is set up correctly.
Tip
By default, Certbot installs a cron job or systemd timer that will renew certificates before they expire.